

Tim's only somewhat a n00b. Tim is an electronics expert, and music hacker; so much so, he created a synthesizer for the Nintendo DS. Sometimes he just needs a little help with the hardware.

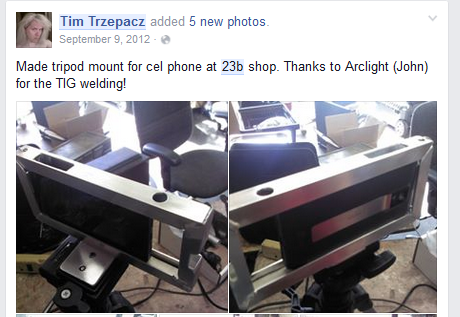
Tim sometimes needs help with his hardware hacking game, to build electronics enclosures and stage accessories for his performances. Tim frequently visits 23b Shop, Mag Labs, and Null Space Labs to do just that. Clearly a hackerspace connoisseur.
Tim uses his product to perform live chiptune compositions, you may remember one such performance from Sparklecon.

Here's a sample of some of Tim's trial-by-fire exploits.


Tim has even gone through the trouble to learn Solidworks to up his game. The process was non-trivial and sometimes painful, but it paid off with awesome looking results.


Recently, Tim asked for advice on how to hack is new things. "Maybe I can use the CNC mill to make the holes in this enclosure?"

The Bridge Troll scoffed, "You've only got a dozen holes! Carefully measure and lay out the panel, and drill away at home! You don't need us to do this child's job!"
CNC milling can be a challenging option, and certainly not one for the inexperienced. CNC is a great option when you're making many copies of the same thing, or if something needs to be quite precise. This is a box with some holes for big knobs, it probably doesn't need to be engineered to aircraft-grade standards. "Go drill that on your drill press, and stop bothering me," I think to myself.
Turns out, the Dunning-Kruger effect also works in reverse. "Their research also suggests that conversely, highly skilled individuals may underestimate their relative competence, erroneously assuming that tasks that are easy for them also are easy for others."
Oops.

"I started off taping the design to the box so that all of the holes would be properly lined up. Then I used a punch to make sure every hole had a proper center point." Too bad we didn't think to mention a center point doesn't do much good without a subsequent center drill (before the real drill)

"Some of the holes could be made on the drill press, but because of the
side of the part and the bends in it, some of them had to be done
"freehand". That's what really gets me into trouble!" NO, DON'T DO IT, TIM!!!

"Even stuff I drilled with the drill press was not immune to wandering, somehow."

As I begin to sarcastically joke, "I remember MY first time drilling thin aluminum," it dawns on me that it wasn't so long ago that it was in fact my first time drilling holes in thin aluminum, and they looked every bit as gnawed and chewed by robotic zombie rodents.
Unfortunately, the diagnosis for recovery on this part was not good. It's much more difficult to put metal back on than it is to take off, and the top half of this enclosure seemed beyond salvation.
Undeterred by so much tilting at windmills, Tim came back to the shop last night with a flat, laser-cut panel of acrylic, determined to replace the now-scrapped curved top by bending a new one.
"Roh'kay Raggy" my inner Scooby-Doo taunts from just beneath my conscious level. Let me guide you, Tim.
We improvised a bending jig by comparing the scrapped top panel to some pieces of wood and bar stock we had laying around the shop.

"No..."
"Allow me to get you something to practice on first, before we scrap the one good part you have." Good lesson to learn right here, if you're going to make one single piece, you might as well make three, because you're going to scrap two in the process.

Turns out propane was a little too aggressive

Aaah, much better with the Harbor Freight heat gun.
Bend one went well.

Another one of those voices bubbled up from my subconscious once again.
"Did you consider a bend allowance?"
"What's a bend allowance?"
*Sigh*

When you make a bend in material, a portion of the material on the outer edge of the bend is stretched around the bend, while the material on the inner edge is compressed.
When this happens, the material deforms, stretches, and shrinks in predictable ways, based on the magical "K factor" of the material. Copypasta for clarity -
"K-factor is a ratio of location of the neutral line to the material thickness as defined by t/T where t = location of the neutral line and T = material thickness. The K-Factor formulation does not take the forming stresses into account but is simply a geometric calculation of the location of the neutral line after the forces are applied and is thus the roll-up of all the unknown (error) factors for a given setup. The K-factor depends on many factors including the material, the type of bending operation (coining, bottoming, air-bending, etc.) the tools, etc. and is typically between 0.3 to 0.5."
Fortunately for Tim, without knowing the K factor (or needing to know, for that matter), his bends were PERFECT.
Unfortunately for Tim, he didn't account for the bend allowance, making his part a little bit short across the top. He made the executive decision to cut a slit down the top of the part, and will patch it later with another flat piece of acrylic bonded to the top. "It's not a bug, it's a feature!"
Nice save, and a VAST improvement from his first attempt a week or so ago.


Well done, Tim.